
My students have more fun!
Setting Up An Electric Guitar
(Les Paul style)
PART ONE: MECHANICAL SET UP
1. File the frets
If you want a
perfect action, no fret can be sticking up less or more than
any other. I
personally have never needed to have the frets filed on an
electric guitar that I have purchased. They have all
been done very nicely at the factory.
To check the
frets, take a 4” straight edge, slide it around on the frets
and look underneath it.
See if any light shines through between the straight
edge and the frets. See
if it rocks. See
if the end of the straight edge gets stuck on a fret when
sliding. If
you see light, if it rocks, or if it gets stuck anywhere on
the neck, you have a problem.
Also, on a used guitar, check the frets for wear --
especially the first three frets. If you have grooves
but they aren't super deep, they can usually be corrected
without replacing the frets (which is expensive to do) by
having them filed.
If you need to
have the frets filed, let a trained guitar luthier do this step.
It requires special tools and knowledge. This is what the
luthier will do:
Remove the strings
Use low tack drafting tape to protect the neck and fretboard
File with a mill bastard file with the convex side down
Every stroke, file from the center to the two edges
Then round the frets with a special file
Use a tiny paint brush to clean the filings off of the neck
Remove the
drafting tape
2. Clean the guitar (used guitars only)
Remove all six strings.
Get some clean cotton rags to use for cleaning. White
flannel with no chemicals (cheap at a fabric/craft store) is
best. Or a microfiber towel. Do not use anything that has been
treated with fabric softener.
A good cleaner for urethane gloss and semigloss finish
(which on most electric guitars is everything except the
fretboard and possibly the back of the neck if the neck is
unfinished) is Rosinol lighter fluid (or naptha, which is
the main ingredient in lighter fluid). It cleans but
doesn’t damage the finish. Second choice: denatured
alcohol. (Note:
naptha is highly toxic to breathe. Use a mask and have
adequate ventilation.)
After cleaning, wax the guitar so that when you clean the
neck all the little steel wool fragments will be repelled
off the body and you won’t scratch the guitar with
them. Any high quality non-silicone car wax will work
well on an electric guitar.
I use Turtle Wax “Ice” spray-on car wax.
Another good wax is Turtle Wax Express Shine spray-on clear
car wax. Do not use a wax or polish with a heavy
silicone base. Do not ever put wax or polish on the
fretboard. Don’t forget to wax the headstock (with the
strings off). If
your guitar’s neck is either painted or gloss urethaned on
the back side, be sure to also wax the back of the neck. If the back of
the neck is raw or dull finished, it’s usually best to just
leave it, or perhaps to lightly polish it with dry 0000
("four aught") steel wool going with the grain.
While all the strings are off, tighten the tuner nuts.
Use a 10mm deep well socket. Don’t overtighten; just a
little snug down. Also
check the tension of the tuners. Turn the tiny screw
in the end of the tuner button, clockwise to increase or
counterclockwise to decrease resistance to turning, so that
they are all have the same feel when twisting.
If you have a rosewood fretboard that is very dirty, use dry
0000 steel wool to clean the fretboard. You can get this at
any hardware store. Don’t use any chemicals.
Don’t rub the steel wool sideways. Go with the
grain. When finished, sweep clean with a clean new
soft paint brush. If your rosewood fretboard is not
excessively dirty, skip the steel wool and skip to the next
step.
Apply oil to the rosewood fretboard. Boiled linseed
oil works well. I personally use Music Nomad Fretboard
F-ONE Oil Cleaner & Conditioner. It has no lemon
oil extracts, waxes, petroleum distillates, silicone, or
water. (Do not use Lemon Oil on the fretboard; lemon
oil is highly acidic and also contains d-limonene, which is
a strong solvent that is used to remove paint and
glue. Both the acid and the d-limonene will dry out
the fretboard.) Blot the oil into a paper towel.
Don’t drench the paper towel.
Just a thin coat is all you need. Rub with the
paper towel to loosen any dirt or grime. Don’t let it
soak into the fretboard. As soon as it’s been evenly
applied, then aggressively wipe off all the oil that has not
sunk into the pores with a clean cotton flannel rag.
Wipe it dry; you don't want oil touching your fingers or
your strings.
If your
fretboard is maple, there are varying opinions about care
for maple fretboards, and I have no personal experience with
them, so you’ll need to do your own research.
3. Install a new set of strings
Be sure to do the set up with a brand new set of the exact
brand and gauge of strings you will be using. For a
discussion of types of strings, LINK HERE.
Install the strings one at a time. I use a simple
method of winding strings that is recommended by Taylor
Guitars. Stretch out each string one at a time and cut
it to length with a pair of dykes. The lowest three
(thickest, wound) strings should be cut to a length about
one tuning pin past the pin it goes into (e.g., for the E
string cut it just past the A pin, A just past the D pin,
and D string just eyeball the distance where another pin
would be past the end of the headstock). The top three
(thinnest, plain steel) strings need a little longer winding
to push the string below the bottom of the tuning peg hole (the sharp
edge on the hole is where a string usually breaks).
So on these strings go about 1 1/2 pins past the pin it goes
into. This method will give about 3 windings on the
thick wound strings and more on the thin bare strings.
After cutting to length, insert each string straight through
the hole so that it sticks out a few millimeters, bend the
string with a sharp bend 90 degrees in the correct
direction, and tighten with a string winder (from the inside
out, which is the pin spinning counterclockwise on strings
4,5,6 and clockwise on strings 1,2,3) while holding the
string with tension with the thumb and forefinger of the
other hand. Make sure the winds go downward, not
upward, and that they are even and snug against each other,
and that they do not cross on top of each other. There
is no need to cross the string over itself. The shape
of the tuning pin will push each wrap against the wrap above
it, which will provide tension so the string will not slip.
NOTE: If you are using
Pyramid pure nickel strings or any other vintage style
strings with round core wires, you need to bend (crimp) the
string before you cut it, or the winding will loosen and
unravel as soon as you cut it, and you'll end up with a dead
sounding string. Crimping the strings is easy to
do. On the bottom three (wound) strings, simply
measure where you want the cut, mark it with a Sharpie,
insert the string through the tuner peg hole to where the
mark is sticking out a few millimeters, and lightly bend the
string around the peg. Then pull it out and with some
pliers make the bend into a 90 degree sharp bend to "set the
wrap." Then insert it through the hole again, and
tighten it up all they way to the correct pitch. THEN
cut the excess string off. The crimp and also the
pressure on the strings on the peg when tuned to pitch
prevent the string from unraveling. You don't need to
worry about this with normal, modern style strings with hex
cores, because they are wound so tightly around the sharp
edges of the hex core wire that you can just cut them and
they won't unravel.
Some people
recommend the twist-under wrap method of winding strings
onto the tuner pegs:
http://www.youtube.com/watch?v=k6klYBJCjWI&list=FLPkOKSjS1T0WGb8qBU8dWUw&index=55&feature=plpp_video
I have used the twist-under wrap method in the past, but
have found that the simple method described above holds the
strings just fine and the guitar stays in tune just as
well. The simple method is faster to install the
strings and also easier to remove the strings when it’s time
to change them, and it gives a cleaner, better looking wind.
After installing each string and partially tightening it,
stretch the string. Start at the bridge. Lift the string
with one hand. Use the other hand to stretch ¼th of the string at a time. Then
move to the next ¼th,
and so on. If you do this, it will stay in tune much
better and not keep going flat during the first few days
(making it “stage ready”).
General Information about Action:
Three things determine the height of the action (the
distance form the string to the fret): bridge height, nut
slot depth, and truss rod tension (which adjusts
the concave shape of the neck, called "neck relief"). These three
things work together, and a change in one will often require
a compensating change in another. In general, the
lower the action, the easier the guitar is to play, but if
it’s too low the strings will buzz.
Action is a compromise, based on personal
preference. Are
you willing to trade a lower action height for a little fret
buzz, or are you willing to trade no buzz for a higher action? What is your
playing style? If
you’re a rocker, you’ll need a higher action, because
strumming hard makes for more buzzing. With jazz, you
can get away with a lower action. In
general, you adjust the truss rod, then tweak the bridge, then
file the nut and the nut slots, then adjust the rod again,
then tweak the bridge again, and so on, until the action is
the lowest it can be with no more buzz than you’re willing to
live with. There
is no right or wrong. If
you feel comfortable with the buzz you have and with the
action you have, then that’s fine!
As previously mentioned, before adjusting
the action, be sure to put a new set of the strings you’re
actually going to use. Different
gauges and brands of strings have
different tension, which will pull the neck more or less and
thus change the action.
Different brands and types of strings even in the
same gauge vibrate differently and may buzz more or less
than others because the vibration width may be wider or
narrower.
4. Truss Rod (neck relief):
The truss rod
is a long bolt that sits in a hollowed out slot in the neck,
which goes from one end of the neck to the other. The
purpose of the truss rod is to offset the tension of the
strings that tries to pull the neck upward. Without a
truss rod, the neck would bow into a concave shape.
The truss rod pulls the neck downward, thus offsetting the
string tension and returning the neck to a more neutral
shape. Not all the way straight, but most
of the way. There has to be a slight concave
curve. If
the neck is perfectly straight, the strings will
buzz like crazy. Because of
their shorter scale, Les Paul style guitars need a
little more "relief" (curve) than do Fender style
electric guitars. Different string
gauges, string alloys, and string winding methods result in
different amounts of string tension on the neck.
Additionally, age, humidity, and temperature changes affect
the wood in the neck. All these things necessitate
occasional adjusting of the truss rod to return the neck to
the "ideal" shape.
In theory, the truss rod has nothing to do with the
"action." In practice, that's not true. In fact,
the truss rod does affect the height of the action, mostly
on the frets in the middle of the fretboard. The tighter the truss rod is, the closer the
strings are to the frets, the lower the action is and
the easier the guitar will be to play, but if it is too
low the strings will buzz when you are playing on the
low frets. However, it's generally better to just
adjust the truss rod to a specific relief and then
adjust the action with the nut slot depths and the
bridge height adjustments.
To measure your guitar's current neck
relief, place a capo behind the 1st fret, and press down
with your right thumb on the 6th string (low E) between frets 13 and 14, so so
that the string is touching the first and 13th
frets. Use a feeler gauge (available at any
automobile parts store) to measure the distance between
the 6th
string and
the 6th fret. Try various thicknesses
of the gauge, sliding one at a time between the string and
the 8th fret until you find
the one that fits perfectly with no play and without
raising the string.
The thickness of that gauge is the measurement.
Then check the
same measurement on the 1st string (high E). The measurement
for the two strings should be close to equal. Based on my own
experience, and my personal preference for a low action, I
have found that if the saddle height is as low as possible,
and the frets are equal height, and the neck is straight,
then the distance between the string and the 6th fret should be appx. .015” on an
L.P. style electric guitar. This is how much the neck is bowed
inward at the center of the neck. .015” will
yield a nice low action with only a little string buzz.
(With a low action, some buzz is normal. All Les Paul style
guitars buzz a little. In my opinion, if it’s not coming through the
amp, it is nothing to worry about.)
To adjust the neck relief, first locate and expose the truss
rod bolt head. On some older Fender style guitars it's
hidden and hard to reach, but fortunately on most L.P. style
guitars it's easy to access, usually under a small plate in
the headstock just above the nut. Remove the two or
three tiny Phillips screws, remove the plate, and you'll see
the Allen style head of the rod. Your guitar should
have come with an Allen wrench that fits it. If not,
find one, and keep it in your guitar case, along with a
small Phillips screwdriver.
if the
measurement is larger than you want, turn the truss rod bolt
clockwise to tighten the rod, which will lower the strings
and decrease the neck relief. Or if the measurement is
smaller than you want, turn the truss rod bolt
counterclockwise to loosen the rod, which will raise the
strings and increase neck relief. It is recommended to
loosen the strings slightly before adjusting the truss rod
to reduce the pressure on the threads so you don’t strip the
threads. I personally prefer to hold the guitar
against my chest and simply bend the neck back while turning
the wrench to relieve pressure on the threads while turning
the wrench in either direction.
Adjust the rod 1/6 of a turn at a time (one face of the
Allen head) then tune the guitar, check the measurement, and
check the action for buzzing. Then check again after
10 minutes to let the wood settle to the new tension (wood
is slower to settle in than steel). You can speed up
this process by putting one hand on the headstock and the
other hand on the body and pushing the neck in the direction
you’re trying to make it go (backward if tightening the rod
and lowering the action, forward if loosening the rod and
raising the action).
5. Bridge Height:
The height of
the bridge determines the height of the action (distance
from the string to the frets) on high frets (from the middle
of the neck to the end closest to the pickups). Like
with the truss rod, the smaller that distance, the lower the
action is and the easier the guitar will be to play, but if
it is too low the strings will buzz when you are playing on
the high frets. To measure the bridge height, place
the guitar on its back with no weight on the
neck. Measure the string to fret gap at the 12th fret with feeler gauges.
Various web sites suggest various action
heights. One
suggests a low action would have .078” on string 6 (low E) and
.063” on string 1 (high E) at the 12th fret, while .125” on string 6 and .094” on string
1 would be considered a high action. (Typically, you
can have the high E around .015” to .030” smaller gap/lower
than the low E.)
Personally, I prefer to go a tiny bit lower
than their suggestion for low action. My action as
measured by open string height at fret 12 is .075 on string 6 and .060
on string 1, and I love it!
On an L.P. style guitar, bridge height is
adjusted by turning the two screws that mount the bridge to
the body. Clockwise
to lower the bridge and reduce the string height at fret 12,
counterclockwise to raise it. On some other electric
guitars, and some aftermarket bridges, the height of each
string can be adjusted independently.
6. Nut slot depth:
Nut height and
nut slot depth affects string height at the end of the neck
closest to the headstock, for open strings that are not
being fretted with your fingers. The objective is to
get as low as you can without the strings buzzing when they
are played hard, when “open” (with no fretting). This
is a tricky and somewhat time-consuming process.
Measure the
distance from the string to fret 1 with a feeler gauge. Based on a
lot of experimentation, and my own personal preference for a
very low action, the lowest you can go on an L.P. style guitar
is:
1E
2B
3G
4D
5A
6E
.010
.011
.012
.014
.016
.018
This provides little margin for error. Any lower and the
strings will buzz. A
(barely) safe margin would be .002 more than those numbers:
1E
2B
3G
4D
5A
6E
.012
.013
.014
.016
.018
.020
This is where my own L.P. style guitar is
right now; it plays like butter and, with the strings I’m
using (Pyramid 10-48 round core pure nickel), there is no
buzzing.
This is MUCH lower than the way most
inexpensive L.P. style guitars (and also most Gibson Les
Pauls) come from the factory.
For example, when I purchased my newest guitar, after
adjusting the truss rod and bridge, I measured the open string
clearance at the first fret, and this is what I found:
1E
2B
3G
4D
5A
6E
.020
.023
.032
.023
.024
.023
Wow.
That was ridiculously high! I started by filing down the bottom of
the nut, very carefully, very slowly, with many test
measurements, to get the two outside strings to my goal. To do this, I
loosened all six strings about 2 ½ turns, pulled them off the
nut, removed the nut from the guitar (this can be tricky the
first time; there are YouTube videos out there showing how to
do it). Then I
used 60 grit sandpaper on a flat surface and rubbed the nut on
it. (I like 3M sander sheets; they are fantastic!). I used an ultra
fine Sharpie to make a mark for how much I calculated I should
sand off. I
never went more than half way on that mark before reinstalling
the nut and tightening the strings and remeasuring. I did this over and
over and over again. It
took hours, but the result was worth it. Remember, if you go too low, you have to start all
over again from scratch with a brand new nut.
Another thing to watch out for: On one
guitar, I sanded down a nut to perfection (or so I thought). The next day, the
guitar was buzzing like crazy.
I remeasured, and guess what? The nut had settled into the neck
overnight and all my strings were .005” lower than they had
been the previous day. So
when you are getting close, make sure the nut is seated and
smashed down with the strings fully tuned and let it sit a few
minutes to settle, then play the guitar a few minutes, then
measure again, before deciding to sand any farther!
After going through this process on my
newest guitar, this is what I ended up with:
1E
2B
3G
4D
5A
6E
.012
.019
.026
.020
.021
.020
As you can see, both of the outside strings
were exactly where I wanted them. I then needed to hand file string slots
2-5, one at a time, very slowly and carefully, with many test
measurements, to get all six slots to my goal:
1E
2B
3G
4D
5A
6E
.012
.013
.014
.016
.018
.020
To do this, you need to have a set of files
that are the same widths as the gauge of the strings. These special nut
files are fairly expensive, but they are worth it. The
best place to buy them is StewMac.com.
If you can't afford them, try to borrow some. If that
doesn't work, the cheap man's solution is to go to the auto
parts store and buy a feeler gauge tool, then with a
Dremmel tool with a thin cut off wheel on it carve teeth into
all the measuring spades.
In essence, turn the feeler gauge set into a set of
files of various widths.
I’m not sure if I recommend this, but back in the day I
set up quite a few guitars using that tool.
There is another, easier, faster way to
measure nut height: Place a capo between the 2nd fret and the 3rd fret and measure the clearance between the bottom
of the string and the 1st
fret. There
should be some space at 1st
fret. If there
is no clearance, there will be buzzing. How much
clearance? One
web site says .010”, but I find that I can get away with
.005" or even less on the first couple of strings, working
my way across gradually increasing the clearance to about
.010" on string 6.
After your nut slot depth is finalized,
check to make sure that the three wound strings (4G, 5A and
6E) have 1/3 of the string exposed, raised above the nut. If one is not
exposed enough, file the top surface of the nut to expose more
of the string.
After finalizing the nut height and the nut
slot depth, play the guitar and see how it feels and how much
it buzzes. Then
go back and tweak the truss rod and bridge height. Experiment until
you get the action just the way you like it.
If any of this sounds too difficult for
you, I recommend that you have a guitar luthier do it for you.
7. Intonation:
After the nut height, nut slot depth, truss
rod, and bridge height are set up, tune the strings perfectly,
then test the octave of each string to see if it is in tune
(finger the 12th fret). If
the octave is sharp, you need to make the string
longer. If it is flat, you need to make the string
shorter.
On L.P. style guitars, the bridge has a separate "saddle" for
each string. The saddle is the highest part of the
bridge where the string touches. Each of those six
saddles is individually adjustable to slide back and forth, in
order for each string to be lengthened or shortened. Under each string, in the
side of the bridge facing the pickup, there is a little
screw (usually flat blade). If the octave is flat, you
need to make the string shorter by twisting the screw
counterclockwise to move the saddle forward towards the neck. If the octave is sharp, you need
to make the string longer by twisting the screw clockwise to
move the saddle towards the tailpiece. (When going
counterclockwise, push on the head of the screw while you
twist, to make sure the saddle is moving and the screw is
not just loosening.) Twist a few turns, re-tune the
string, and test the octave again. With trial and
error, you'll find the perfect spot where the open note and
the fretted octave are equally in tune on your tuner
display.
8. Tailpiece:
Joe Bonomassa claims it gives the Les Paul
more sustain if you bolt the tail piece all the way down and
top wrap the strings around it. Supposedly the benefit
comes from increased vibration transfer to the body resulting
from bolting the tail piece solidly down onto the body. Other people online
claim that either top wrapping or simply raising the tailpiece
to reduce the angle of the string bend over the bridge allows
the strings to ring a little more, which adds some extra
harmonics.
On the other hand, most Les Paul setup
instructions say to do the opposite. They say for maximum sustain to lower
the tail piece as far as possible without the string touching
the bridge: “The tailpiece should just be lowered enough so
that the bass strings just do not touch the bridge for maximum
sustain. The
tailpiece can be offset a little higher on the bass side.”
The best expert I know told me that top
wrapping or raising the tailpiece will only improve the sound
if you are using heavy gauge strings like Joe Bonomassa uses
(which are hard to bend and stiff to play). If you top wrap or
raise the tailpiece with light gauge strings, there is not
enough bend in the strings at the bridge to put enough
pressure on the bridge to transfer the tone to the body. With normal and
thin gauge strings, the opposite of what Bonomassa says is
true: a steep angle helps.
The height of the tailpiece is adjusted with the two giant
flatblade screws in the end of the tailpiece. Clockwise
lowers it; counterclockwise raises it.
I personally have my strings go straight into the tailpiece,
and I have the tailpiece all the way down as far as it will
go.
9. Speed Knobs:
With pull pots (discussed below), the stock
Gibson "hat" knobs (AKA "bell" knobs) are too hard to grab and
pull quickly during performance, especially when holding a
pick. If you are
using pull switch pots, the cheapest and best modification
ever is to buy some “speed knobs” (also called "hatbox" or
"barrel" knobs) which are much easier to grab and pull. Even if you are not
using pull switch pots, speed knobs are easier to grab and
turn, and most people also think they are better
looking. Many colors are available on Amazon and Ebay,
but be careful: not all speed knobs will fit your
guitar. There are two different sizes of pot shafts on
L.P. guitars:
The "USA" or "Imperial" or "SAE" or "fine" or "24 spline" type
is 3/8". The shaft has 10 splines on each side of the
split shaft for a total of 20. The knob has 24 splines
because it has 4 more ridges to account for the space in the
split. This type is stock on USA made Gibson Les Pauls.
The "metric" or "coarse" or "18 spline" is 6mm. The
shaft has 8 splines on each side of the split shaft for a
total of 16. The knob has 18 splines because it has 2
more ridges to account for the space in the split. This
type is stock on most L.P. style guitars made in Japan, Korea,
and China.
Do not get the wrong knobs
for your pots; they will not fit!
10. To Prevent Switch, Knobs, and Jack
from Loosening:
Loosen the
pickup selector switch nut, the output jack nut, and the four
pots’ nuts. Paint the threads with clear fingernail polish and
reassemble. This
will prevent them from coming loose.
PART
TWO: ELECTRONIC SET UP
11. Audio vs Linear Taper Pots:
Most Les Paul style guitars come with
linear taper pots (look on the back of the pot to see which
type you have: "A" means “audio” and "B" means linear; for
example B500K means linear taper, 500,000 ohms).
Most people who try audio taper pots prefer
them, but only if they are a good brand. If not, they are
lousy. You have
to spend more for a good quality true audio taper pot. Bourns and PEC make
good ones. Alternatively,
you
can modify a linear taper pot with a feedback resistor to give
you a reasonable approximation of an audio taper response.
Here is a great article on this topic: http://www.geofex.com/article_folders/potsecrets/potscret.htm
Personally, I don't want to mess with it so I just buy
quality Bourns audio taper pots. They work great.
What is the difference between linear and
audio taper? A
linear taper pot rolls off the actual volts (and therefore,
the actual volume) evenly.
As you turn the knob down, the drop off of actual
volume is smooth. However,
human beings don't hear changes in volume evenly. As volume
increases, we notice increases and decreases less and less. Some experts say it
takes as much as 10 times as much actual volume for us to
perceive a doubling of volume. Thus, although linear taper
pots roll off actual voltage and actual volume smoothly, they
seem to roll off the
volume very slowly at the beginning, and then faster as it
goes. The change
at the beginning (10 to 7 on the knob) sounds very slow and
barely noticeable. Then
as we turn the knob down more, we perceive the volume dropping
very rapidly at the end (3 to 0).
In contrast, with audio taper pots, the
actual voltage and volume drop in a logarithmic manner: very
rapidly at the beginning (10 to 7) and then very slowly at the
end (3 to 0), but the roll off seems smooth to our
ears, with a perceived drop that is equal at the beginning (10
to 7), in the middle (6 to 4), and at the end (3 to 0).
On a clean sound, the purpose of the volume
pot is to actually control volume, and audio taper works well
for this because it gives smooth control of perceived volume. But on a distorted
amp, turning down the volume doesn’t really decrease the
actual volume coming out of the amp very much. Mostly, it reduces
distortion and cleans up the sound. This is where opinions vary. Some people say
dialing back distortion in the amp is smoother with a linear
pot because an audio taper drops the output too rapidly at the
beginning of the turn to get a smooth transition, whereas the
linear dials back volume more slowly/smoothly at the beginning
of the turn, providing fine “shades of dirt.” Critics of this idea
(including me) say that with linear taper most of the
“cleaning up” happens below 3, and it is very sensitive in
that range and, therefore, hard to control.
In contrast, with audio taper, the
“cleaning up” happens quickly and linearly. Some people
(including me) like this because they want a fast response to
pull back distortion and don’t want to turn the knob so far to
get the reduction of distortion. One guy said, “I find audio taper easier
to use in a gigging situation because most of the change is at
the useful end of the volume pot, so smaller adjustments are
required. I find
cleaning up by going from 10 to 5 a lot easier than cleaning
up by going from 10 to 2, which can be hard to find in a split
second in the middle of a song when you're not actually
looking at the guitar - you have to go to 0 then roll it back
up!” A friend of
mine who uses audio taper likes to set his amp to feedback at
10, screaming solo at 9, and when he dials volume to 5 he gets
a clean sound.
I strongly prefer audio taper volume pots. They seem much more usable, logical, and musical to me than linear. After doing some research, I concluded that Bourns “premium” audio taper pots are the very best on the market. These pots use a conductive polymer resistor, instead of carbon, that is accurate and very quiet, and doesn't wear out like carbon does. They make two types: the black 95 “Premium” pot and the blue 82 “Vintage” pot. The 82 is a little bigger and costs a little more than the 95, but lasts longer and has easier solder tabs, and that's the one I use for my volume knobs. They are expensive but they work really well, are completely silent, and should last a lifetime.
The only bad thing about the 95 and 82
premium pots is that Bourns does not offer them with DPDT
switches, which are needed for various modifications that are
discussed below. Bourns
does make some reasonably priced audio taper pots that use
carbon media that have DPDT push-pull switches. They are
not as good as the premium pots, but they are decent
quality. That's what I use for my tone
knobs.
One more thing to be aware of when buying
pots is the length of the shaft. Guitar pots are offered in two shaft
lengths: “short shaft” (the threads are appx. 3/8”) or “long
shaft” (the threads are appx. 3/4”). Not all L.P. style guitars use the same
length pots. Before buying pots, make sure you know
which length your guitar uses.
When replacing pots, be sure to solder the ground wires
correctly. Any "cold solder joints" will cause noise, or
damage tone, or come loose. I highly recommend the use
of a 50W soldering iron and some rosin flux. A 30W iron
can't heat the back of the pot hot enough to bond it to the
solder; and even if it could, it would take so long to heat
the joint that it could damage the pot.
12. True Bypass Tone Pots:
To get a tiny bit more brightness when the
tone knob is all the way up, you can modify your tone pots so
that when turned up all the way (10 position) the signal is
completely disconnected from the capacitor (true bypass). This is done by
removing the back of the pot and using an Xacto knife to
scratch/scrape off the carbon on the pot at the full volume
position. This
is nice in theory, but there’s a problem: to do this, you have
to disassemble the pot… and you can’t disassemble Bourns
premium pots (they are sealed), nor a push-pull pot with a
DPDT switch mounted on the back. Besides, the difference
would be so small as to hardly be worth the effort.
13. Modified Treble Roll-Off Tone
Capacitor:
The capacitor in the stock tone circuit is
a high pass filter. That
means only the high frequencies pass through, and the bass
frequencies are cut off.
But because the capacitor is wired to ground, the
effect is opposite: it acts
as a low pass filter in the signal path because it
bleeds off the treble to ground. Thus, the high frequencies are dumped to
ground, while whatever tones remain (low frequencies) continue
on to through the volume control and out the jack to the amp.
This is why the circuit is called a low pass filter,
because the lows "pass" through the circuit while the highs
are eliminated.
The value of the capacitor (mF or uF)
determines at what point in the frequency spectrum the
frequency cut-off occurs.
The higher the capacitor value, the lower the frequency
of the cut-off point. In other words, higher capacitance value
caps will make your tone darker when the tone control is set
below 10, because in addition to very high treble frequencies,
some upper midrange frequencies will also be dumped to ground
as the tone knob is turned down. Les Pauls generally have .047 uF caps,
although most L.P. clones use .022 uF. Various people use
caps as high as .068 uF and as low as .010 uF. Personally, I
prefer the .022uF.
The amount of reduction of treble tones
above that frequency is determined by the value and position
of the pot (and this, of course is affected by whether the pot
is audio or linear taper, as discussed above).
The bottom line is this: If you don’t like
how your guitar sounds when turning down the tone knob because
too much upper midrange is being cut, so it sounds muddy and
lacking definition, and you find yourself wishing the tone
knob would only attenuate the very highest treble frequencies
instead, you can choose a smaller capacitance value capacitor. This will make the
elbow of the curve a higher frequency, so that turning down
the tone knob does not make the sound as muddy. Conversely, bigger
capacitance value capacitors will roll off more upper midrange
tones.
In addition to reducing treble as the tone
knob is turned down, the capacitor also has another function
in the circuit. When
the tone knob is turned all the way up (to 10), the capacitor
acts as an inductor that improves the tone of the guitar. Gibson’s web site
explains it this way: “When rolling a tone control all the way
back, the capacitor forms a resonant circuit with the pickup
that provides a midrange boost.” The reason guitar experts use big, fat,
high voltage capacitors instead of smaller ones is increased
inductance. A
.022 uF 400V capacitor sounds better than a .022 uF 25V
capacitor even though they have the same capacitance value
(and even though guitar circuit voltages are measured in
millivolts).
Different brands and types of capacitors
make the tone circuit sound different, even if they are the
same capacitance value and voltage rating. Cheap ones can be
very inaccurate and can vary in capacitance +or– 20% from
their stated value. Also,
with cheap capacitors, capacitance can vary with frequency,
temperature, and applied voltage. Some cheap capacitors are even
microphonic, which means they make noise when the guitar is
moved. If the
capacitor value is inconsistent, the resonant peak created by
the capacitor can have a different frequency at different
times. All this
can make the guitar sound different under different
conditions. All
L.P. knock offs, including Epiphones, and even most Gibsons,
come with cheap capacitors.
Sprague Orange Drops are generally
considered a very good upgrade capacitor for the price. They offer
stability, resistance to temperature variation, low moisture
absorption, excellent characteristics in AC circuits, no
microphonics, and therefore consistent tone. The Orange Drop
“715” (600V) is the current production capacitor that is
recommended by most people.
The Orange Drop “716” (400V) has more flexible copper
leads and costs more but some people say it doesn’t sound as
good because it is compressed during manufacturing so that it
is not round in shape. I
found a pair of NOS Orange Drop 418’s (600V .022uf) on Ebay
for super cheap. Some
people say they sound even better than the 715’s. All I know is they
sound great in my guitar.
Replacing capacitors is an easy soldering job. Just
remove the existing caps and solder the new ones in their
place.
14. Capacitor Markings:
Modern Orange Drop and other newer
capacitors are not intuitive to read the value. Instead of
traditional uF markings, the value is stated as a 3 digit
number: 2 digits, followed by another digit that indicates how
many zeros to add on to get picofarads, followed by a letter
that indicates tolerance.
micro is uF = .000001F (1 millionth of a
farad)
nano is nF = .000000001F (1 billionth of a
farad)
pico is pF = .000000000001F (1 trillionth
of a farad)
Examples:
102J means 1,000 pF which is 1 nF which is
.001 uF
682J means 6,800 pF which is 6.8 nF which
is .0068 uF
123J means 12,000 pF which is 12 nF which
is .012 uF
473J means 47,000 pF which is 47 nF which
is .047 uF
(J is + or – 5%)
15. Treble Bleed (aka Treble
Compensation or High Pass Filter):
With “modern wiring” (with which nearly all
Les Pauls and L.P. clones have come from the factory since the
mid 1960s), as you turn down the volume, the treble decreases,
making the tone darker. I’m
not completely clear on the reason why. All I know is when
you turn down the volume (even just a bit), the high end or
treble loss is not proportional to mid and bass reduction. A small cut in
volume creates a far greater reduction of treble than of bass.
One way to deal with this annoying treble
loss is to install a “Treble bleed” capacitor onto the tone
knob pot. The Treble Bleed cap goes across the
terminals of the volume pot.
It acts as a high pass filter that allows treble
to bleed across the volume pot and not get turned down as much
when the volume is turned down.
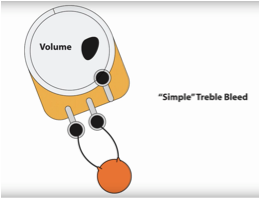
There are three types:
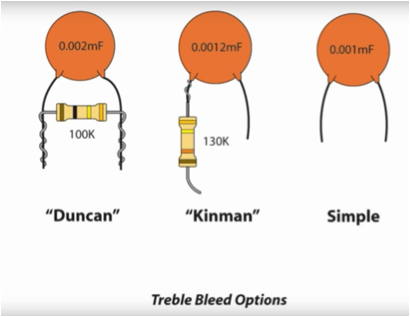
“Simple” (right above
and right below) is simply a high pass filter. It seems stupid
to me because it allows the full treble to always go to
signal path no matter where the volume knob is. In other words,
the volume knob won’t turn down the volume of the high
frequencies at all.
(Including if the volume is turned all the way down!) Another problem
is selecting a value for the capacitor. Premier Guitar
recommends a 300-500pF capacitor (silver mica), while the
diagram above recommends .002mF, which is 4-5 times as
big. So, who
is right?
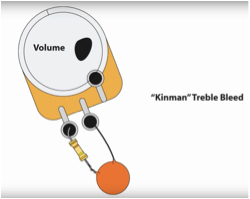
“Kinman” (center in both of the above
diagrams) does the same thing as Simple, but the
addition of the resistor makes the effect less drastic. This one
makes more sense to me.
But again, opinions on what size of capacitor and
resistor to use vary widely. The diagram above recommends a
.0012uF with a 130K resistor. Premier Guitar also recommends a
.0012uF silver mica capacitor and a 130K resistor. But someone
else online said “2A123J (.012 uF, which is 10 times as
big!) cheap green capacitors work, and you can try any
resistor you want.”
Again, who to believe?
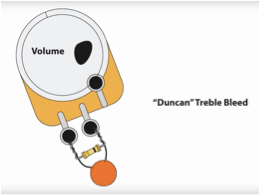
“Duncan” (left in both of the above
diagrams) is also less drastic than a Simple, but it
additionally modifies the effectiveness of the pot in
turning down the mid and bass frequencies. DiMarzio
recommends the Duncan style with a 560pF capacitor and
a 300K resistor. However,
the above diagram recommends a .002uF capacitor (4 times
as big) and a 100K resistor (3 times as low). Premier Guitar
recommends halfway inbetween: a .001uF capacitor and a
150K resistor.
Once again, it is hard to know who to trust.
All of these options are very easy to
install. Just solder the capacitor (and resistor)
to the terminals of the volume pot as shown in the
diagrams. But all of them seem to have problems
from a common sense standpoint. It seems to
me that they have the potential to create the opposite
problem: as you turn down the volume, the treble
increases and the tone becomes brighter!
A fourth option is proposed online by
someone named Frank Falbo. It seems to make the most logical
sense to me. He
doesn’t like the three common Treble Bleed circuits
because he claims they don’t work for clean jazzy solo
stuff with the tone control down. He says, “The
problem is when you've got the tone knob down, and
you're working the volume knob, at the tone knob you're
cutting the highs, while on the volume side you're
letting the highs pass through while reducing the lows,
so you're sucking tone from both ends.” His solution is
instead of the high pass cap jumping across the volume
pot, the high pass cap runs through the tone pot (see
diagram below). This
makes the tone pot into a double purpose pot. One side of
the wiper still controls the amount of treble cut from
the tone knob, while the other side controls the amount
of treble added through the Treble Bleed cap. When you have
the tone knob all the way up, there is no change. The pickup
hot is feeding 100% through the Hi-Pass cap to the
center lug, and everything is as it was. But as you turn
the tone pot down, the Hi-Pass cap becomes less and less
"connected" to the pickup hot (due to the tone pot's
resistance increasing) and therefore allows less and
less "Hi-Pass" filtering to occur. Eventually, when the
tone knob is all the way down, the Hi-Pass is
disengaged. This
makes the tone knob totally usable even when you're also
playing with the volume knob.

Some people claim that a
treble bleed circuit is the worst thing in the world
and that it will destroy the tone of good pickups. Pickup
manufacturers say this is a massive over-statement,
and that most people who try treble bleed circuits
with correct sized capacitors and resistors find them
to be a good improvement with little or no perceptible
tonal trade-off.
Personally, I decided to not do any
of these high pass treble filter options, because I am
more impressed with the other option for fixing the
treble drop problem: Vintage Wiring (below).
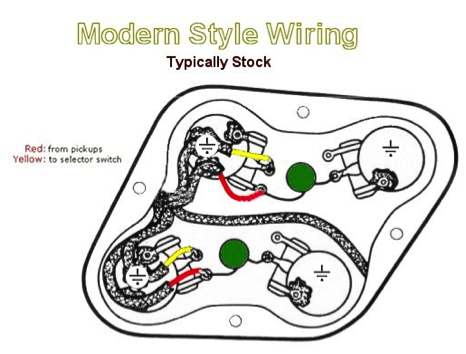
16. Vintage Wiring:
“Vintage wiring” is another way to get rid
of the treble loss when turning down the volume pot.
With “modern wiring”
(see below), the tone control receives its signal from
the input of
the volume pot. Thus,
it is connected directly to the pickup. The advantage of
modern wiring is that the overall volume does not drop
when you turn down the tone knob. The disadvantage
is that it results in the nonproportional treble
attenuation when turning down the volume knob discussed
in the previous section.
With “vintage
wiring” (see below), which was used in Les Paul’s in
the 1950s and early 1960s, the tone control receives
its signal from the output of the
volume control (i.e., the wiper of the volume pot… unless you
use volume knob isolation, discussed below). In this
method, the voltage going to the tone circuit is
always equal to the voltage going to output, no matter
how the volume knob is set. This makes the effect of the
tone circuit proportional to the volume, regardless of
where the volume knob is. The advantage is
that turning down the volume does not increase the
percentage of the treble signal that goes to the tone
cap and pot, and therefore, when you roll down the
volume control, you don’t have a disproportionate
treble roll-off. The disadvantage is that
turning down the tone knob decreases the overall
volume a bit.
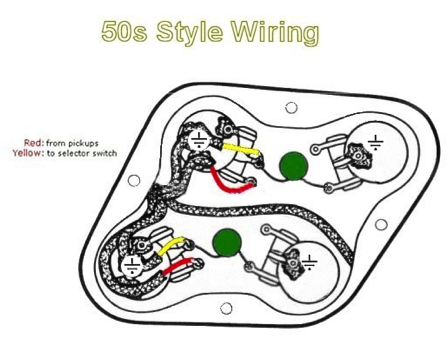
I have a friend who owns a 1964
Gibson SG, and it came from the factory with vintage
wiring. He likes it so well that he has
re-wired all his guitars this way. It
eliminates the treble loss without the need for a
treble bleed (discussed above.)
Which is better? It really
depends on your guitar, pickups and playing style. The
modern wiring will maintain the overall volume
better when you roll down the tone knob, but at the
cost of losing a bit of high end when you roll down
the volume knob.
If you have a bright pickup that may not seem
that bad of an idea, because with less volume and
the same amount of treble the tone might be too
piercing. On
the other hand, the vintage version keeps the amount
of treble the same when you turn down the volume but
drops a bit in volume as soon as you roll down the
tone pot. What
you might prefer is very much subject to personal
preferences."
This is a super easy modification to do. Just
unsolder the capacitor from the left terminal on the
pot and solder it to the center terminal.
I’m very fond of vintage wiring.
I have
modded my guitar to have vintage wiring, and it
works great.
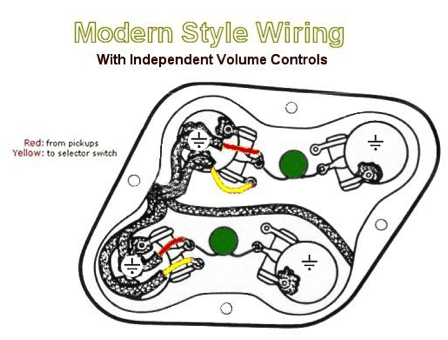
17. Isolation of Volume Pots
(AKA Independent Volume Controls):
With stock wiring (either modern
or vintage), when both pickups are engaged (i.e.
when the pickup selector switch is in the center
position), when you roll down the volume of one
pickup, even slightly, while leaving the other fully
open, this makes the latter much louder than its
mate. Even worse, backing down just one of the
volumes to zero shuts off the entire guitar. This
happens because the pickups are wired in parallel to
each other so the two volume controls interact, so
that if you roll off the volume of either pickup, it
affects both pickups rather than just the one you
turned down. This
is very annoying.
It eliminates part of the advantage of having
separate volume controls for each pickup (in fact,
with the switch in the center position, you would
have better control with just one master volume
circuit.)
There is a
simple modification that cures this. On each
volume knob, instead of wiring the middle (wiper)
lug to the output and the left outside lug to the
pickup, you can wire the middle (wiper) lug of the
volume pot to the pickup and the left outside lug to
the output. This
trading of input and output lugs will “isolate” the
two pickup circuits so that turning down one pot
won’t reduce the volume of both pickups. Here’s why
it works: With stock wiring, the more you turn down
the bridge pot, the less resistance to ground there
is going from the neck pickup through the bridge pot
to ground. But
with the isolation wiring modification, if you turn
down the bridge volume pot, there would still be
500K resistance to ground going from the neck pickup
through the bridge volume pot.

This is another
easy modification to do. Just unsolder the
wires going to the volume pot, trade them, and
resolder.
The advantage of
this modification is that in the middle
switch position you are allowed to dial in the exact
balance you want between the two pickups without
sacrificing volume. In theory, this
might sound neat, but there is a big disadvantage:
as you turn down volume (with the selector in any
position), it takes out a huge amount of your high
end. In
other words, it makes the treble bleed problem
discussed above even worse. This is
because when the volume pots are wired backwards,
when you turn down the volume it will increase the
impedance to ground.
This results in a dramatic loss of treble
when you roll back the volume.
I do find it very annoying that if you turn
down one pot all the way, it kills the volume of
both pickups, even if the other one is still turned
all the way up.
But this volume pot isolation modification
would defeat the improvement gained from vintage
wiring, and make the treble loss problem even worse. So I
don’t use this modification in my guitar.
A Note about
Humbucker Pickup Theory and Terminology:
Before we move
to the next section, we need to say a word about the
type of pickups that are on Les Paul type
guitars. Unlike Fender Strat and Tele guitars
that use single coil pickups, the LP uses two
so-called "humbucking" pickups. Each of these
pickups is comprised of two separate coils, which
are wired in series. Commonly, one of the coils will
have adjustable “screw” pole pieces (designed to
give an adjustment for string-to-string balance, as
discussed in the next section), and the other coil
will have non-adjustable “slug” pole pieces. These two
coils are connected out of phase, and are reverse
(magnetic) polarity from each other - which means
they are in phase sonically. The
reason it’s called a “hum bucker” is because
magnetic energy from the string’s vibration is
created in phase, but the out of phase wiring of the
two coils will cancel most nonmagnetic
radio-frequency noise, hum and interference.
Think of it this
way: the two coils are wired opposite each other,
and they also have their magnets placed with reverse
polarity to each other. For this reason, the two
“finish” wires both come out the same side of the
guitar as each other (one goes to signal and the
other to ground) and the two “start” wires both come
out the other side (and are wired together). Even
though this makes the two coils out of phase with
each other, it works because the reversed windings
and magnet polarity reverses this and puts them back
into phase.
Pickup
terminology is very confusing. In normal
Gibson wiring, the South/Screw coil is the coil that
the “-” (or “ground”) lead is connected to ground. The
North/Slug is the coil that the “+” (or “hot”) lead
connects to the signal path. And the
South/Screw “+” (or “hot”) lead is connected to the
North/Slug “-” (or “ground”) lead. But with
different terminology, the South/Screw is the coil
that the “Finish/Inside” lead is connected to
ground. North/Slug
is the coil that the “Finish/Inside” lead connects
to the signal path.
And the South/Screw “start/outside” lead is
connected to the North/Slug “start/outside” lead. Thus, +
and - do not translate to start and finish. In fact,
the definitions are completely different and half
the time they are reversed! I’ve
decided to ignore any diagram that uses + and - . I only
use the start & finish terminology, which seems
to be used by the more sophisticated/informed
electric guitar crowd.
18. Pickup
Height:
For hottest
output, if you press the string at the highest fret,
then measure the distance from the neck pickup at
the pole to the bottom of the string, the distance
should be 1/16”.
However, there
are several advantages of having a distance of 1/8”
to 1/4”:
1) to prevent
“magnetic dampening” which is when the magnetic
force of the pickup pole piece slows down the
vibration of the string and kills sustain and
tone... (magnetic dampening decreases and sustain
increases with the string a little further away from
the pickup).
2) to reduce
string buzz by taking some magnetic pull off of the
strings that pulls them toward the frets.
3) to adjust the
relative volume of the two pickups by raising or
lowering the hotter of the two.
4) to brighten
and sweeten the tone... (a pickup too close to the
strings will be thick and dark; moving it farther
away from the strings will brighten it up).
So, if you have a neck pickup that is too dark or too loud or both, this is the solution! Lower the pickup to thin the tone and lower the volume. Turning the pickup mount screws clockwise will raise the pickups and counterclockwise will lower them.
A variation of
this is when you lower the pickup, you can raise the
pole piece screws about 1/8” to 3/8” out of the top
of the bobbin.
This makes the screw coil “hotter” (louder)
than the slug coil, which has two benefits: first,
it makes the output of the pickup stronger when
using coil cut (explained two sections below), so
that it’s not as big of a drop in volume when
switching to coil cut; and second, many people say
that unbalanced coils make a humbucker sound more
open and sweeter.
Another way to accomplish the same thing is
to tip the entire pickup a little. I like
the way my neck pickup sounds when tipped this way.
Final adjustment
to make each string equal in volume to the other
strings can be done by adjusting the height of each
individual pole piece screw. The poles
are like mini volume controls for each string. You can
stair step with the thinnest strings closer to the
screw and the thickest farther away. Step up
from E to A then D.
G might be a little lower again or the same
as D. B
should be the same as G, then high E should again
step up. In
general, it is not recommended to turn any of the
screws in so they are below the face, and most
people say low E should be almost flush.
Turning pole piece screws clockwise will lower them
and counterclockwise will raise them.
I have found
that with the pure nickel strings I’m using, the
three lowest strings (the wound strings) do not have
as much magnetic energy and thus are lower volume
than the three upper strings (the plain steel
strings) and so I have raised the screws more on the
lower three to offset this characteristic.
Rough adjustment
from side to side can also be done by tipping the
pickup slightly sideways, by adjusting one pickup
mount screw slightly higher than the other.
Lowering the
neck pickup helped my guitar tremendously. It made
the two pickups closer in volume to each other, and
it made the neck pickup brighter and less heavy on
bass. I also tipped the neck pickup slightly
so that the screw pole is closer to the strings than
the slug pole.
19. Coil cut
(aka: coil shunt, coil tap, coil split, single
coil switching):
Coil cut is a
method of wiring that changes a humbucker into a
single coil pickup by disconnecting one of the
coils. This
drops the volume and makes the sound “chimey,”
brighter, and less fat, like a Strat. Wiring
this modification isn't hard but takes some
dexterity. All
you need is one "push-pull" tone pot that has a DPDT
switch attached.
You easily can buy pots with switches on Ebay
or from StewMac.
The two wires from the neck pickup that are
connected to each other and not connected to
anything else (the South start and the North start
leads) get soldered to the center terminal on one
side of the switch, and ground goes to the terminal
directly below it. The two corresponding wires
from the bridge pickup get soldered to the center
terminal on the other side of the switch, and ground
goes to the terminal directly below it. When the switch
is “on,” this grounds both ends of one coil, while
leaving the other coil active, effectively making a
humbucker into a single coil pickup.
My L.P. clone
came from the factory with coil cut, using two DPDT
switches (one to do coil cut on neck and the other
to do coil cut on bridge). But it only takes one DPDT
switch to do a coil cut on both pickups. Because
I’ve never found a situation where I wanted one
pickup in single coil mode and the other in
humbucker mode at the same time, I wired both
pickups to one switch so I only have to pull one
switch to do coil cut in both pickups. This
speeds up the process on stage, and it also freed up
the other DPDT switch for another purpose, which
will be explained below.
In normal Gibson
wiring (screw coil goes to ground; see the previous
section), if the start-to-start jumper wire is
grounded by a coil cut switch, that would leave the
slug coil active.
There are two advantages of grounding the
screw coils and leaving the slug coils active during
coil cut: First, the slug coils are the two that are
closest together, which will give them more “quack”
when in the center switch position during coil
cut. Second, on the bridge pickup, the slug
coil is farther from the bridge than is the screw
coil, which gives it more output and warmth than the
screw coil in the "Treble" or bridge switch
position.
On the other
hand, there are two advantages of having the screw
coils active during coil cut. First,
during coil cut, the screw pickup, which has been
individually adjusted for string volume, is the
active one, so those adjustments will be active
during single coil operation. Second,
if we’ve made the two coils unequal by screwing out
the screws 1/8-3/8” (or tipping the coil), the screw
coil will be the louder of the two, making the
volume drop less drastic when switching to coil cut. My L.P.
clone was wired from the factory for the screw coils
to be active during coil cut and I've decided to
leave it that way, but it would be fun to try it the
other way to see how it sounds...
It would be cool to make the screw coil active on
the neck pickup and the slug coil to be active on
the bridge pickup, although I suspect there might be
an issue with the phase in the center switch
position. I'm not sure. I decided it was
too much work to find out, so I stayed with using
the screw coils.
20. Coil Cut
Pot:
Instead of or in
addition to a coil cut switch, you can put a volume
knob in series onto the coil cut ground. That way,
you can partially
dial in the second coil. I think this is a brilliant
idea. I
love it. I
would do it if I had a spare pot available. But I
don’t, and I don't want to drill more holes to add
one.
21.
Series/Parallel wiring within each pickup:
There are two
entirely different things people mean when they say
the words “series” and “parallel” pickup wiring. The first
is where each individual pickup is wired so that the
screw and slug coils are switched to be either in
series or in parallel with each other (stock is
series). The
other is where the two pickups are wired so that the
neck and bridge pickups are switched to be either in
series or in parallel with each other (stock is
parallel). The
first is discussed here; the second is discussed
Section 23, below.
Normally each of
the two coils in a single humbucker pickup are wired
in series. This
means the electrical signal goes through one coil in
one direction and then back through the other coil
in the other direction, such that the ground and out
wires are both on the same side of the pickup. You can
wire up a switch that can to change them to
parallel. Parallel
means you connect both coils together on both ends,
so that the electricity goes through both at the
same time, from one side to the other, such that the
ground wire is on one side and out is on the other. With parallel,
the sound is much brighter and thinner, sort of like
coil cut. One
advantage of parallel over coil cut is that parallel
retains some of the RF noise rejection of the
humbucker dual coil design, whereas coil cut is just
like a Fender… noisy.
Some people claim that parallel wiring can be
really good sounding, with “more twang” than coil
cut, and that Jimmy Page used it a lot. They say parallel
wiring is especially useful if you have hot pickups
because you can go from loud and fatter to quieter
and airier.
Another
disadvantage with individual pickup series/parallel
switching is that the wiring is very complicated,
and each DPDT switch can only do one pickup. So you
need two DPDT switches (one for each pickup) to do
parallel/series switching in both pickups. If you have
only two switches like I do because you’re using the
Bourns Premium audio taper pots with the conductive
polymer element for volume, then the series/parallel
switching it will take both of the tone knob
switches and you won't have any switches for any
other purpose.
I personally
like the sound of coil cut, which takes only one
switch, so I don't bother with within-pickup
parallel switching.
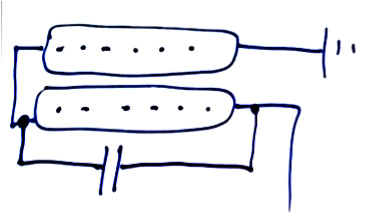
22. Humbucker
Treble Bypass:
I found this in
a YouTube video: In a normally wired (in series)
humbucker pickup, you can add a .005uf capacitor in
parallel with whichever coil is second in the series
(the one that goes to the volume knob, which in most
guitars is the slug coil). This would be done by
soldering one end of the capacitor to the junction
of the two coil wires that are wired together, and
the other end to the input terminal of the volume
pot.
This is a
particularly useful modification on a guitar that
has too muddy of a sound on the neck pickup. It keeps
the fat humbucker bottom end and most of the noise
rejection, but it lets some high frequencies through
to brighten up the tone. If it brightens up too much, an
inline resistor can be inserted to reduce the
effect. You
can experiment with different values of capacitors
to change the frequencies that are passed through,
and you can also experiment with various values of
resistors to change the amount of the effect. Or you
can use a volume pot to make it adjustable.
The theory of how this works is it lets the high frequencies from the first coil bypass the second coil, thus avoiding the blocking of the high frequencies from the first coil by the inductance of the second coil. But the low frequencies are not affected so they sound the same as they did before.
The guy on the video called this “the best of
both worlds” between series and parallel, and he says it
sounds good with distortion.
It seems like a great idea to me. You end up with the
tight bottom end of a humbucker with the high frequencies of
a single coil. I
haven’t done this personally because lowering and tipping
the pickup took care of the “dark neck pickup” problem to my
satisfaction.
23. Series/Parallel wiring between pickups:
The stock Les Paul wiring puts the two pickups
in parallel with each other when the pickup selector toggle
switch is in the middle position. The Jimmy Page wiring allows the
option to switch between parallel and series. Putting the two
pickups into series makes a very dark, fat sound. From what I’ve read and
heard, most people who have tried it
say that the series sound is not very useable
because it is too dull.
This mod takes one DPDT switch. Since I only have
two switches, and one is already taken for coil cut, I
decided that phase reverse is more useful than
series/parallel wiring between pickups.
24. Phase Reverse:
This mod (also from Jimmy Page) allows you to
reverse the phase of one or the other pickup, in order to
place the two pickups out of phase with each other when the
pickup selector toggle switch is in the center position. This gives a
“scooped” sound. (The
phase reverse has no effect when the pickup selector switch
is in the Rhythm or Treble positions.)
This mod takes one DPDT switch. I have opted to
use my second switch for this purpose. I don’t use it
often, but it does make an interesting sound and I use it
once in a while.
25. Master Treble and Bass Roll Off:
Below is a schematic for a master treble cut
control and a master bass cut control that use the stock
500K pots and one of the stock .022uf capacitors, plus one
.0022uf cap and a 1meg resistor. I think it’s an
intriguing idea. It
would be sort of like the treble and bass knobs on my
basses. It
doesn’t matter what pickup or pickups you’re using, there’s
one treble knob and one bass knob for the entire instrument
(instead of one treble knob for each pickup and no bass
knob). A
variation of this wiring diagram could make the treble roll
off only for the bridge pickup and the bass roll off only
for the neck pickup.
There are some obvious advantages to having a
single treble roll off and also a bass roll off. This would give
the most flexibility to instantly change tone no matter
where the pickup selector switch is and no matter where the
two volume knobs are set.
On the other hand, you might lose the inductance
effect (midrange boost) from the orange drop capacitor in
the treble roll off circuit that was discussed above. Also,
it might mess up what you can do in phase reverse mode.
Another option would be to have the stock treble
roll off on the bridge pickup and a variable Humbucker
Treble Bypass (treble add – see 24 above) on the neck
pickup.
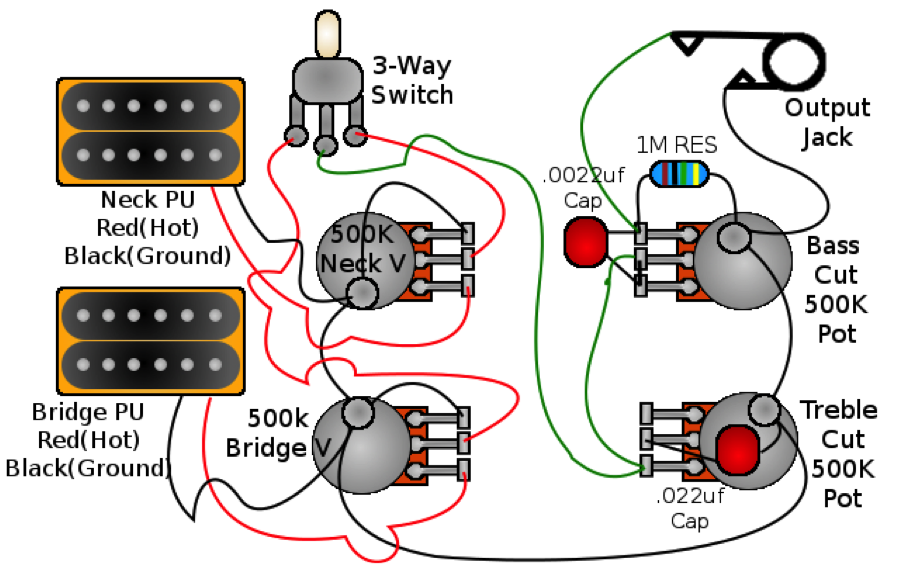
So far, I’m happy with just lowering the
neck pickup and leaving the tone circuits stock except
to change to vintage wiring.
Overall
Wiring Summary:
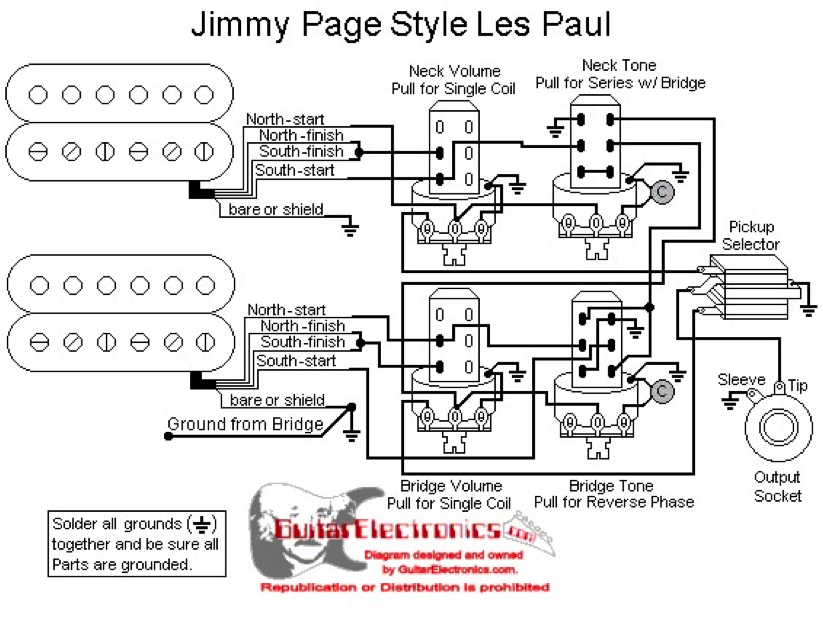
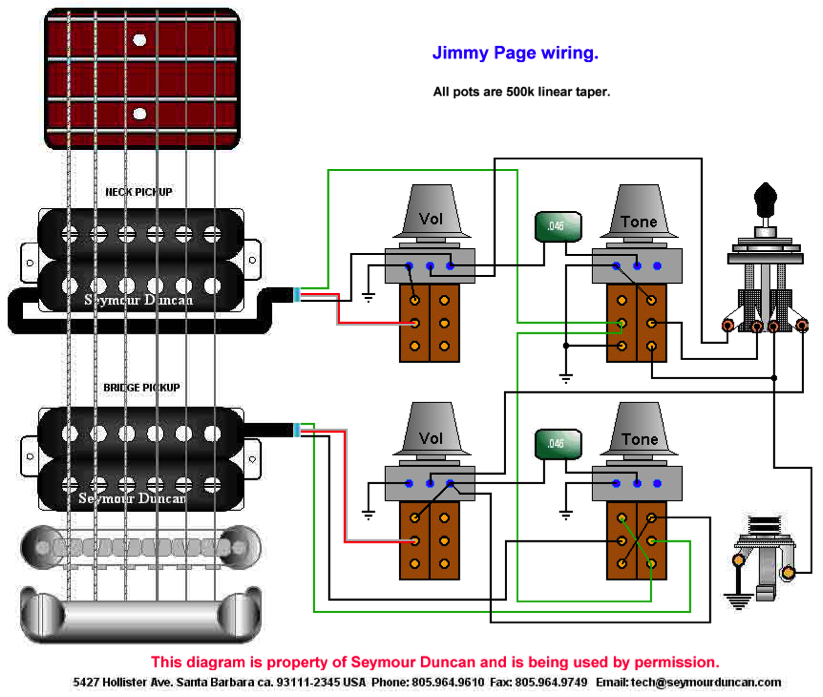
Here’s a diagram using three switches (coil
tap, phase, and parallel). I used this schematic for the coil
tap and phase, but I did not do the series/parallel:

Here’s the Jimmy page schematic
(same as above but with separate coil cut switches
for each pickup):
Recommended Maintenance Products:
Dunlop 65 String Cleaner and Conditioner on
the strings. This
stuff is great. It
cleans off gunk and strings feel silky after
application.
Music Nomad Fretboard F-ONE Oil Cleaner & Conditioner for the rosewood fretboard. It cleans and reconditions and protects.
Turtle Wax "Ice" spray-on clear car wax, or Tutle Wax "Express Shine" spray-on clear car wax, for all urethaned and painted surfaces.
CONTACT INFORMATION